So I attempted to install the Midnight inlet today, obviously should be a 5-10 minute job, especially with how much access I have.
I had even taken some ‘you, versus the guy she told you not to worry about’ comparison images which, of course, are hilarious.
View attachment 91473
View attachment 91474
View attachment 91475
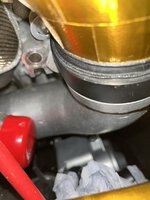
First thing that you’ll notice gets in the way is the oil feed line.
View attachment 91477
View attachment 91478
So persuade that onto a different route, fine, not ideal, but fine.
Then it clashes with the chain tensioner pretty badly if you want it in the standard position.
View attachment 91479
View attachment 91480
I have since filed and hammered some clearance into the inlet to get it somewhere close to the standard location. I will have to get the inside welded and ground back because I have had to file through all the weld on the outside and then some more.
View attachment 91481
View attachment 91482
View attachment 91483
View attachment 91484
The tab/bracket to the head also didn’t have enough clearance.
View attachment 91485
I will tidy this all up and get it to work, I’m just a bit pissed that the inlet just doesn’t fit right. I had already put a few hours in with a die grinder to clean the weld on the inside, and then a couple more gold taping it, and now I need to undo the taping to tidy up the clearance I needed to make. I guess the other option I could have done would be to cut off the bracket that holds it to the head and remake that, which I am going to have to do anyway, but then the fit to the standard clean air pipe would be even worse! If I was happy with it clocked over like that, I could’ve just lopped the bracket off and had that re-welded on.
Here are some images with the factory clean air pipe after my clearancing, it is bolted to the valve cover. You can see how off centre the bracket/tab bolt hole is.
View attachment 91486
View attachment 91488
Here is the same setup with the Pure inlet. It fits better to the clean air pipe, but isn’t fully seated into the turbo. The bracket that holds it to the head also doesn’t fit that well, but it aligns okay I guess.
View attachment 91489
View attachment 91490
I’m curious to know how other people’s fit! I will drop Midnight an email and let them know.
The Midnight inlet does clear an FTP turbo outlet, so that’s good at least. Am I expecting too much? Seems to me like there’s not a ‘perfect’ inlet on the market just yet.